Upgrading the Hard Drives in my Synology DS413 NAS

I initially loaded my Synology DS413 Networked Attached Storage (NAS) device with (4) 1.5TB hard drives. They were drives that I’d pulled out of a server that I was decommissioning last year and I was having issues with other 1.5TB drives that I’d purchased about 4-5 years ago starting to go bad. I guess it was MTBF (mean time before failure) time for them and besides, I needed more head room for storage on the NAS.

I replaced the first (3) drives before it dawned on me that others might be a tad nervous about replacing drives in their NAS just as I was, so I took some screenshots of the process as I replaced the fourth and last drive. They are at the end of this post below. Each time I replaced a drive, the repairing and expanding timeframes took longer and longer. By the time I replaced my final drive, it took almost 2.5 days to finish repairing and expanding the mix. From start to finish I’d budget about a week if you were following suit.

I chose to use the Synology Hybrid RAID (SHR) for protecting my data on this unit. Mainly to get some experience with it and to get away from the requirement to match drive sizes like I would typically do in a RAID 5 or 6 scenario. Some things to note are that the amount of usable storage did not increase when I replaced the first 1.5TB drive with a 4TB drive. It wasn’t until I replaced the second HDD that the amount of usable storage increased. Then it increased again when I replaced drive 3 and again when I replaced drive 4.

Everything went relatively smooth, even though the process took quite a bit longer than I’d expected. As always, “back up your data” before attempting this. I was fortunate enough to have a Drobo 5D with enough storage capacity, so I used Robocopy to copy the files over to it before I started this process. Hopefully this reduces your angst a tad when you go about planning and implementing an upgrade to your Synology NAS unit.

Before upgrading the last disk

Before upgrading the last disk


Pulled Disk 4 out of the unit

Pulled Disk 4 out of the unit


Clicked on the Manage button at the top

Clicked on the Manage button at the top


Choose Disks dialogue - new drive was pre-selected - clicked Next

Choose Disks dialogue – new drive was pre-selected – clicked Next


Accepted warning that all data on Disk 4 would be erased.

Accepted warning that all data on Disk 4 would be erased.


Confirmed warning that related services might be temporarily interrupted.

Confirmed warning that related services might be temporarily interrupted.


Finally clicked Apply to start the repair process with the new disk.

Finally clicked Apply to start the repair process with the new disk.


Initializing and repairing the disk.


Part 1 - checking parity consistency

Part 1 – checking parity consistency


Part 2 - Expanding the file system

Part 2 – Expanding the file system


And we're done - capacity increased to 10.73TB

And we’re done – capacity increased to 10.73TB

Posted in Computers and Internet | Tagged , , | Leave a comment

SFW 50 Shades of Grey

50 Shades of Grey – the safe for work version

Posted in Entertainment | Tagged | Leave a comment

Re-Tasking the GPUs to Litecoin Mining

In my last post – Bitcoin Mining for Fun and (not much) Profit – I described my experiences with mining for Bitcoins using my (3) Radeon HD 7970 graphics cards. I ceased my GPU-based mining operations because even with my max mining rate with the three cards of ~ 1.5GH/s I am only able to mine about 0.001BTC/day. Even at a valuation of $1000/BTC (current best-case-scenario) that only comes to about $1/day if I ran them all full-speed with fans-a-blazing. Definitely not worth the power they’d draw, much less tying up two machines 24×7.

I have now switched my efforts over from mining Bitcoins to mining a similar virtual currency (arguably the next contender for the Bitcoin virtual currency top-spot) called a Litecoin. Mining Litecoins is very similar to mining for Bitcoins. I even use the same CGMiner software (version 3.7.2 as it’s the last version that supports GPU mining afaik) except I have to throw in the “-scrypt” parameter into the command-line when I fire up the software. I also have to point it at a Litecoin mining pool & port as well.

The process is very similar to Bitcoin mining. You have a virtual wallet – I am running the Litecoin-Qt version that they link to from the main Litecoin site. You still mine for the Litecoins using software such as CGMiner or the like using your GPUs. The main difference between Litecoin and Bitcoin is that the hashing algorithm that you’re running is using Scrypt, which is a password-based key derivation function that is both computationally intensive, but also requires a healthy chunk of memory for each iteration (~128KB/iteration I believe). This makes Litecoin mining much more difficult to parallelize using custom Application Specific Integrated Circuits (ASICs) or Field Programmable Gate Arrays (FPGAs) – which are in heavy use for Bitcoin mining now. This means that my GPUs which, since I am running the mining software on a PC with access to lots of RAM, gain new life as Litecoin mining rigs.

Remember when I said that I could get ~600MH/s from the Radeon HD 7970 graphics cards (each) when mining for Bitcoins? The same 7970s are only able to calculate ~ 580KH/s (that’s kilo – meaning thousand hashes per second) for a total of ~1.5MH/s with all (3) cards running straight out. Since there aren’t any ASICs (that I’m aware of at this time) to put them to shame (not yet anyways, more on that later) – that means that GPUs are pretty much the shizzle for Litecoin mining at the moment.

To give you some perspective, I’ve been tasking all (3) of my 7970’s to Litecoin mining on a Litecoin P2Pool mining pool node for the past week or so. In that time I’ve been able to acquire about 3.8LTC. At a market valuation (as of today) of $24.1/LTC, that’s 3.8LTC x ($24.1/LTC) or $91.58 worth of Litecoins that I was able to mine with them in a week. If I tasked them to Bitcoin mining I’d make about $7 worth of Bitcoins based on my back of the napkin calculations. So, for now, it’s much more profitable to mine Litecoins with them.

I haven’t given up on the Bitcoin mining. I’m just not mining using GPUs – I’m using (2) Butterfly Labs ASIC mining appliances to do that now. One is capable of performing 30GH/s and the second can perform 10GH/s for a total of ~40GH/s. As of today, they are able to generate about 0.014BTC/day at today’s difficulties or (assuming a best case $1000/BTC valuation) about $14/day or $98/week. Not too far off from the Litecoin operation using the GPUs.

This GPU re-tasking may be short-lived however. I ran across a company called Alpha Technology which claims to be coming out with a “Viper (Scrypt) ASIC Miner” which, according to their website, are capable of doing 5MH/s & 25MH/s depending on the unit. As with all good arms races, it seems that my GPUs may soon be relegated to strictly gaming it seems.

I posted my Bitcoin and Litecoin QR codes and addresses off to the right side of the blog now BTW. Just in case anybody is sitting on a butt-load of virtual currency and would like to help fund my virtual currency mining “habit” ;?)

Posted in Computers and Internet, Science and Technology | Tagged , , | Leave a comment

Bitcoin Mining for Fun and (not much) Profit

I’d like to share some of my experiences with Bitcoin “mining” for those who have asked about it. The two main sites that can give you a run-down on Bitcoins are the Wikipedia article on the Bitcoin Protocol and the main Bitcoin Wiki site. I’d like to give some feedback on my personal experiences as I tried to generate my own Bitcoins.

Unless you are given Bitcoins (also referred to as “BTC”) in exchange for goods and/or services, you have to attempt to be the first person to figure out a value that, when hashed against the latest value spit out by the Bitcoin powers that be, result in a number with a pre-determined number of leading zeroes in the answer. The more zeroes that the system requires as proof of doing the work, the harder (and longer timeframe) that the problem will take. The system is configured to only release BTC into the wild at a fairly constant rate. To slow things down when the answers are being calculated too rapidly, the system will require an increasing number of leading zeroes in the hash result.

In the early days, the hashing operations were done using the CPU of a users computer, so the field was relatively level. Pretty much anybody could download the Bitcoin-Qt software, set the “server=1” and “gen=1” option in the “bitcoin.conf” file and away they’d go. Well, after they downloaded the entire blockchain and it was verified (which can take a couple of days when you’re just getting started). The CPU of your computer would be worked pretty hard, so it wasn’t much use for too much else. The people with the higher-end CPUs had an advantage over those with less capable CPUs, but the average person had a chance to at least compete.

The field changed a bit when some programmers realized that they could leverage the plethora of GPU cores (graphical processing units) that were contained in many higher end graphics cards. The nVidia cards did okay, getting in the 10’s of MH/s (MegaHashes/second), which was much faster than the standard CPUs could perform the hashing operations. The AMD graphics cards did much better – with my Radeon HD 7970 cards racking up about 580MH/s each. In order to leverage the GPUs, however, you had to forgo use of the Bitcoin-Qt software as a mechanism for calculating the hashes and only use it as your Bitcoin as a wallet to store your BTC balance as well as a means to send and receive payments to other Bitcoin users.

In the spring of 2013, I tinkered with BTC mining using my existing nVidia graphics cards. After weeks of cranking away at ~ 60MH/s (million hashes per second) I decided that I needed to build a new server for the house. I took a look at the Mining Hardware Comparison tables and it turned out that the AMD Radeon line of GPUs were much better at mining operations than the nVidia cards. I believe the Radeons had more cores and that they had a single instruction for performing the hashing operation, which made them much more suitable for BTC mining.

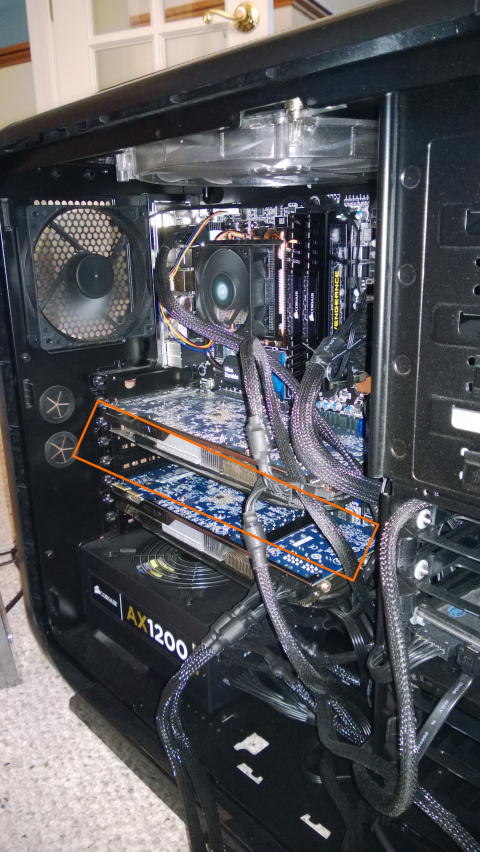
In doing my research, I found that some enthusiasts were plugging multiple graphics cards into a single case and running them all in parallel to increase their likelihood of guessing the correct hashing value. I decided that my new server had to be able to handle at least (3) full length PCI-e graphics cards. Since most high-end cards took two slots due to the fans tacked onto the side, PCI-e slots needed to be staggered to every other slot so that I could fit the (3) cards into the motherboard. The other problem is that the power requirements to run each graphics card at full-speed was pretty substantial. Some enthusiasts tried to get away with a 500 watt power supply, only to have it (and/or the graphics card) get fried in the process. This meant that I would need to size the power supply accordingly.

The mining workstation that I ended up with had the following hardware:

  • Gigabyte AMD Radeon HD 7970 Graphics Cards (3)
  • Corsair AX 1200 Watt Power Supply
  • Corsair 16GB Vengeance DDR3 1600MHz memory
  • GIGABYTE GA-990FXA-UD5 Motherboard (AMD processor slot)
  • AMD FX-8350 FX-Series Eight-Core Processor Edition, Black AM3
  • Corsair Graphite Series Black 600T Mid-Tower Computer Case (CC600TM)

The good news was that when I initially fired up the workstation and ran the CGMiner software to start hashing with the GPUs I was cranking out ~1.6GH/s (1.6 giga hashes per second). The bad news is that two of the GPUs heated up pretty rapidly since their fan intakes were adjacent to the graphics cards printed circuit card of the card next to them. The software throttled back their workload to try to keep the GPUs at a safe temperature, which meant that the sustained hashing rate ramped back down to ~1.1GH/s. If I removed the middle graphics card, the airflow was restored for both of the remaining graphics cards and they were capable of doing ~1.2GH/s with just the two cards. It didn’t make sense to keep all three in the unit, so I took the 3rd graphics card and put it into a separate PC that could only  handle one full-length PCIe card. With both systems mining, I got ~1.6GH/s, which was pretty good at the time.

GPU mining rig with the middle graphic card removed

GPU mining rig with the middle graphic card removed

I ran the two systems for several weeks, hoping to strike pay-dirt and amass my fortune in Bitcoinage. I was running them during the early spring when it was pretty cool out, so the heat that they added to the home office was welcome. I even moved one of the mining workstations down into our downstairs bathroom to keep that warm. Alas, after several weeks, I had not struck gold. Not a single Bitcoin was mined.

More research showed that the odds were pretty stacked against me. Too many people had too much hashing power in use, and the likelihood of me beating them to the answer was pretty slim. The fallback was to engage in a Mining Pool. This is where you and several others join forces and all contribute your hashing efforts to a Pool operator. The odds were much better that the combined might of the Pool would come up with the answer and collect the BTCs. The pool operator would keep track of the number of hashes that each member had contributed towards finding the correct answer and would divide the BTCs between the participants. My efforts yielded about 0.1 BTC every week or so, which ever so slowly built up. Every once in a while I would try solo mining and not contribute my efforts to the pool, but I’d always end up going back to working with the pool. Hey, 0.1 BTC in the hand was much better than 0 BTC in the bush ;?)

When the weather started warming up, I had to shut down my mining operations. The heat that the GPUs were cranking out were making the office uncomfortably warm. The WAF (wife acceptance factor) also sunk to an all-time low when the noticeably higher electric bills started rolling in. With the weather warming up, that would be more pronounced as I’d have to run the A/C to remove the excess heat as well. So my mining efforts ceased over the summer.

I tried firing the units back up this winter as the added heat was a bonus, but the GPU mining capacity was just not comparable to the new FPGAs (Field Programmable Gate Arrays), which were just as fast, if not faster, than the GPU hashing capabilities. The newest big boy on the block are the ASIC mining rigs – which leverage custom Application Specific Integrated Circuits which are engineered solely for the purpose of performing hashing operations. ASIC mining rigs from outfits like Butterfly Labs can crank out from 5GH/s all the way up to 250GH/s and use a tiny fraction of the power that the GPUs required. In response to this, after version 3.7.2 of CGMiner, the author opted to remove GPU support from the mining software as it was not deemed worth maintaining support for them since they were so far behind the ASIC mining rigs. My meager GPU rig would only yield 0.1BTC after a couple of months of mining. The ante had been raised.

There are a second generation of ASIC mining rigs coming out of Butterfly Labs based on 28nm chip technologies that are supposed to crank out from 300-600GH/s per unit. I’d LOVE to be able to get ahold of some of these new ASIC rigs, but right now they’re out of my league price-wise. Especially since they don’t take credit cards to purchase a rig, only ACH transfers or Bitcoins are accepted for payment for their rigs. I had amassed enough BTC to purchase a single 25GH/s Butterfly Labs rig, but it is only able to pull in about 0.1BTC every week or so. The heat output is much more manageable, but the fan noise is substantial and the buy-in is pretty steep.

Unfortunately I bought my 25GH/s mining box a tad too soon. Butterfly Labs just dropped their 50Gh/s unit prices down below what I paid for the 25GH/s unit. The 300GH/s and 600GH/s units are not yet available for sale either. They are on a pre-Order status as of the time that I’m writing this. Once they hit the streets, the ante will be raised once again, with the payout from the various mining pools falling even further. And, of course, the difficulty level of the Bitcoin mining tasks will adjust even higher to compensate for the increased hashing power that’s being brought into the mix.

The good news is that I now have an awesome gaming workstation for my son and I to use with in our PC gaming adventures. That was always my goal for the rig once my experimentation with GPU mining was finished. I also have my Butterfly Labs 25GH/s ASIC mining rig that I obtained with the almost 3 BTC that I managed to mine over the many months of experimentation. I’m now down to 0.3 BTC and I’ll see how far my pooled mining efforts will take me over the winter. I’d love to be able to build up enough to get one of the 600GH/s rigs from Butterfly Labs when they finally launch (sometime in Feb 2014 from what I hear). I refuse to pay my hard-earned cash for a mining rig, only to see the bottom suddenly drop out of the Bitcoin valuation – it’s looking quite bubblish at the moment, but I don’t mind spending virtual currency on them while they’re still useful for something. I also have a spare Radeon HD 7970 graphics card if anybody wants to barter for it.

If you’ve got some Bitcoins that you’d like to donate towards my research and experimentation efforts – feel free to send them my way – I’ll put them to good use ;?)

Donations gratefully accepted at: 1CdbFRVEXJ8Y55B1LATpSmMegKmmy5zvoe

Follow me on Twitter @cpuguru

Posted in Computers and Internet, Science and Technology | Tagged , | Comments Off on Bitcoin Mining for Fun and (not much) Profit

Recovering Game Settings from your XBox post RROD

We went out to do some grocery shopping last night and came back to an upset young man. Apparently the XBox 360 that we’ve had for some 5-6 years finally bit the dust – posting an “E-74” error on the screen and displaying the dreaded red ring around the power button. The worst part of all was that my son had been playing his new Skyrim game over the holidays and was fretting over the thought that he’d just lost all of his hard work. The new XBox 360’s won’t accept the older externally mounted hard drives from the older units – what to do? No worries though…Dad to the rescue!

XBox 360 Hard Drive Transfer Cable

Fortunately, I had upgraded our systems hard drive from the original 20Gig HDD to a much beefier 120Gig HDD a few years back. The new drive came with an XBox 360 hard disk transfer cable, which has a special attachment on one end that snaps onto the external HDD connector and which has a USB connector on the other end. Once we got a new XBox 360 (the other one was probably 6+ years old) it was a simple matter to plug the old XBox hard drive into the USB port on the front of the new XBox and transfer the user accounts, avatars, videos and yes, game settings and saved games over to the new console. Problem solved and the son is downstairs swinging his broad sword and saving the world from Orcs…although he smells like a wet werewolf at the end of some of his quests ;?)

Posted in Computers and Internet, Science and Technology | Tagged , | Comments Off on Recovering Game Settings from your XBox post RROD

MIT Drone Maps Room in Real Time Using a Kinect

I’m totally digging the innovative uses of the Microsoft Kinect, with novel uses popping up every day. I also love the fact that my son, your daughter…pretty much anybody can start exploring and tinkering in this space because of this sub $200 piece of gear. The MIT/UW video caught my eye this morning…using a Kinect mounted to a quadrotor drone to create a 3D map of an environment. It sparks the imagination with possible uses underwater and on other planets where GPS isn’t an option. Keep up the good work guys!

More info can be found via their “Visual Odometry For GPS-Denied Flight And Mapping Using A Kinect” post.

Posted in Computers and Internet, Science and Technology | Tagged , , , , | Leave a comment

Applying Visual Studio 2010 Service Pack 1 with WebPI

Last week Service Pack 1 for Visual Studio 2010 was released to the masses. There were just two ways to install it, either run the web installer which pulls down just the bits that you need to install for your particular setup of VS2010 or pull down the ISO from Microsoft that had all of the VS2010 SP1 bits wrapped up in it. I went the ISO route and patched Visual Studio on my laptop without incident.

Now it’s been a whole 2-3 days and voila – a mo’ better way. I saw a tweet from @BradWilson today saying that “the best way to install VS2010 SP1 is via WebPI: it rolls in IIS Express + tools & SQL Compact 4 + tools”. Being the adventurous type that I am, I fired up the Microsoft Web Platform Installer version 3 (aka WebPI) and sure though, there was a “Visual Studio 2010 SP1” option. If you don’t have WebPI already installed, you can get it here. Even if you don’t run VS2010, go and get it as it’s pretty much the swiss army knife for devs and admins wanting to add server and support software to your desktop and server. I added the VS2010 SP1 and let WebPI have at it. The installer churned for quite a while on #1 of 10 of the additions it was installing (the VS2010 SP1 installer) and afterwards gave me a pop-up saying it needed to reboot to continue installing the rest. I clicked reboot and when the system restarted WebPI fired back up and a UAC prompt popped up asking me if it was okay for it to continue making changes to my system. I said yes and a few minutes later the following window popped up when it completed.

WebPI VS2010SP1 Completion

WebPI VS2010SP1 Completion

As you can see, a lot more than just the SP1 got installed. IIS 7.5 Express, SQL Server 2008 R2 Mgmt Objects, Web Deployment Tool 2.0 and some tooling to support SQL Server Compact Edition 4 (SQL CE 4) were added to my system. A most welcome feature as it keeps me from having to hunt them down. Good job guys!

Posted in Computers and Internet | Tagged , , , , | Comments Off on Applying Visual Studio 2010 Service Pack 1 with WebPI

NoScript add-on for Firefox

If you’re like me, you frequently get called on to help others out when they experience “issues” on their computers. Let’s face it, we’re front-line tech support for many of our family and friends. One tweak that I like to do on family computers is #1 to switch them over to using Firefox as their default browser and #2 installing the NoScript add-on to Firefox. CNet has a quick video explaining NoScript (see below) but I end up having to take a more pragmatic approach by selecting “Scripts Globally Allowed”. Let’s face it, the first time a site doesn’t work because scripting was blocked, they’re going to make you set it anyways.

Even with scripts allowed globally, NoScript still protects you from other issues including Cross-Site Scripting (XSS), Click Jacking and other nastiness that they’ll run across while browsing. It even has a setting to help encourage SSL connections to various sites to help prevent cookie hijacking while you’re on the road. While not a complete secure browsing solution, it’s another layer of security that MAY result in a couple less support calls.

Don’t just take my word for it, Steve Gibson has mentioned NoScript many times in his Security Now podcast. For more info on NoScript and what it offers, scope out the features of NoScript.

Disclaimer: Your mileage may vary. Don’t blindly follow my lead…do your own research and configure the sphincter pressure of your NoScript settings at whatever comfort level you have based on your research.

Posted in Computers and Internet | Tagged , , | Leave a comment

Texas Puke

We’re heading over to a community-wide Chili cook-off in a few minutes. Rather than trying to compete with the “most authentic” or “hotter than blazes” categories of chili, we decided to make a concoction that I can only categorize as “most addictive”.

The reason our entry is called “Texas Puke” is not actually known. Some surmise that it is because it “looks like puke” as it has a wide assortment of beans, salsa, cheeses (does Velveeta actually count as a “cheese”?) and other goodies thrown in. My assertion is that it is called “Texas Puke” because it is so yummy and so entirely addictive that you’ll eat plateful after plateful until you actually puke. This was proven at one gathering wherein my older brother ate so many servings that we lost count and, while driving home, he asked us to pull over so that he could yack alongside the road. Not because the food was bad – quite the opposite, it was so good that he couldn’t stop eating it.

Texas Puke in a crock pot

Texas Puke in a crock pot

The recipe was shared with us by one of my dearest friends – Mr. Ed. Where he got it from is unknown. All I know is that I expect to inflict a consider amount of over-eatage at tonight’s festivities. Here’s the recipe:

Ingredients:

  • Hamburger (2-3 lbs)
  • Pinto Beans (1 can)
  • Salsa – medium/hot chunky (1 jar)
  • Hormel Chili w/beans – (1 can)
  • Chili Beans (2 cans)
  • Heavy Whipping Cream (1 pint)
  • Velveeta Cheese (4 lbs)
  • Mozzarella Cheese – grated
  • Tortilla Chips

Cook hamburger and drain fat. If you want, you can add Italian sausage for more zing. Add Velveeta cheese, beans, whipping cream and salsa in a crock pot and cook for 1-2 hours on slow simmer. Stir often or it will burn.

Once it has cooked, serve over tortilla chips and sprinkle with mozzarella cheese. I usually let the individuals partaking of this delightful goop to season it with whatever chili powders, chipotle seasonings, etc. that they feel their tongues can endure.

Enjoy!

Posted in Uncategorized | Leave a comment

OCEANIC Tech Talk from Two Years Ago

I was doing some housekeeping on one of my web servers this afternoon when I ran across an old Tech Talk video that I recorded two years ago. The OCEANIC Tech Talks were lunchtime presentations that I did every few weeks that basically covered new technologies that had piqued my curiosity. I’d bring a loaf of bread and some peanut butter and jelly for those who didn’t bring their lunch with. I let this particular video run in the background while I worked this afternoon and it dawned on me that not much awesomosity (my made up word) has happened in the last couple of years technology wise. An interesting look back for sure.

Technologies that I discussed were varied and mostly things that I thought could be of use to us either in our personal lives or in our research endeavors.There was one minor disturbance near the beginning when somebody walked in late for the session and they were up on the main campus (~86 miles north of the southern campus) and they were trying to get the two-way video feed to wake up from sleep mode. I was experimenting with Camtasia to do this kind of screencast and never published it because of the little interruption.

Topics for this particular Tech Talk included:

Eclectic and varied technologies for sure. A little bit of something for everybody. Definitely something that I enjoyed doing – researching cool new technologies and presenting the most interesting ones to my colleagues. Now if only I could paid to do this (Note: Donations to the University can indeed be made and earmarked for OCEANIC towards that end ;?)

Posted in Computers and Internet, Science and Technology | Leave a comment